Search This Blog

Showing posts with label Home. Show all posts

Wednesday, September 28, 2011

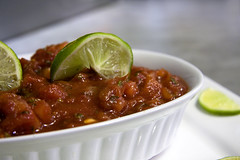
No-Cook Cranberry Salsa

Pin It SalsaImage by ayngelina via FlickrHere is a wonderful cranberry salsa recipe by Kris Mayberry.


Makes 6 cups; Total time 15 minutes
1 Navel Orange, quartered
1 12 oz. bag fresh cranberries
1 1/2 cups fresh pineapple, diced
1 1/2 cups Granny Smith apple, diced
1 cup Jicama, peeled, diced
1 cup pecans chopped and toasted
3/4 cup sugar
Pinch of salt

Wednesday, October 6, 2010

Getting Ready for Halloween!!!

Pin It
It's October!  Halloween is coming!  It's time for costumes, candy, and decorating!!!  Oh, and don't forget the pumpkin carving either.  It is a great way to spend quality time with your family and to nurture your creativity.  Here at Basic Living, we gathered 15 yummy recipes for you to try this Halloween season.  Be sure to start trying them early, so you can use your favorite ones to make your Halloween even yummier!

Tuesday, October 5, 2010

What's for dinner tonight?

Pin It
Isn't trying to decide what's for dinner one of the hardest things sometimes?  It seems like I repeat the same recipes every two weeks.  In an attempt to get inspiration on what to make for dinner, I used to spend hours watching the cooking channel.  Over time, I began to enjoy cooking for my wife and to take chances with new things.  Well, today was one of those days where I had to improvise and adapt to the world around me.  I usually make this dish with cream of mushroom soup, but when I was half way done the reality struck me like a bolt of lightening "we're out of cream of mushroom!"  Here is the accidental recipe which turned out to be a home-run!

Saturday, October 2, 2010

Survival Food!!?

Pin It
So, it's not really considered a "survival food" where we live, but for some it might serve as a survival food when there is nothing left to eat.  Although I grew up in a culture where bee larvae are considered a delicacy, I probably wouldn't be able to get myself to enjoy one of these unless it was the only thing available and I haven't eaten anything for days...  Just in case you are curious, here is the recipe for those who are brave enough to try some.

Wednesday, September 29, 2010

Oatmeal Recipe

Pin It


Instant Oatmeal Packets
To make individual instant packets:
Blend 1/2 C. of oats until powdery.
Into each of the 10 packets (perhaps individual sealable sandwich bags) combine the following ingredients:

  -1/4 C. unpowdered oats
  -2 TBSP powder oats
  -1/8 tsp. salt
  -1 tsp. sugar (optional)
  -Close the top and store in a dry place.


Monday, September 13, 2010

The end of another Season

Pin It
Well it's the end of another season; you know the one that we call summer, and with that means the end of a couple of things, one of which is the end of gardening. In Japan the rice is being harvested, in Idaho it's the potatoes, and somewhere around the Nebraska area the corn is being husked. All of this signifies the end of the heat season while waiting for the cold winter season to settle in.  During this time the prices on things such as apples and strawberries, lettuce and tomatoes all rise and we become meat eaters, simply because the prices on produce are high enough to make one broke.
But what  about our vegetables? What about the healthy stuff that keeps us sane? Since it's too cold for crops and gardens to survive outside, Basic Living has equipped themselves with a few products that will keep you healthy and happy this winter season. By simply adding some healthy greens that can easily be grown indoors you will be eating healthier this winter season. Sprouts are a great way to add variety and greens into your life. They can be grown indoors and can be used in soups and salads or even added to a sandwich if such is desired.  From the wonderful easy sprout or the Kitchen crop Sprouter you can be growing sprouts in a matter of days.  The interesting thing about sprouts is that there is such a wide variety to choose from.  Just a few that can be used in these wonderful little sprouters and grown anytime of the year include: Alfalfa, curly cres, daikon radish, and green peas. More options are available and prices vary but can be found at Basic Living all year long.
Try sprouts this winter season and find out what you have been missing!
Happy Sprouting!!!
Enhanced by Zemanta

Thursday, July 22, 2010

Find us at the Rexburg Farmers' Market

Pin It
It's summer time!  That means it's time for Rexburg's annual farmers market.  It is a great place to find fresh produce and hand-made crafts and more!  This year, we are also going to be part of the farmers market by selling our home made beef jerky made with our dehydrators and a Bosch Universal Kitchen Machine.  We are seeing continual success with our jerky.  Last Friday, we sold out of three flavors: Mama Mia Italiano, Bacon and Cheddar, and Hot, HOT Salsa. 


We also held a jerky eating contest.  Our contestants were required to chew and swallow ten pieces of jerky with various flavors.  Spicy ones included!

Jerky can be made at home very easily with the use of a jerky seasoning mix and a dehydrator.  Check out our store for tools to help you get started on your jerky making project. 


We have a winner! 

If you live in Rexburg, or anywhere near the area, the Rexburg Farmers Market is the place to be on Friday evenings.  If you are in the area between 4 p.m. to 8 p.m. stop by and try our jerky for free!  Come and talk to Jim about making your own home made jerky and what tools we have for you at the store.  Hope to see you there tomorrow!
Enhanced by Zemanta

Tuesday, July 20, 2010

Applesauce - the home made way

Pin It

After a few years into marriage I decided that making my own baby food was the best way to go to provide better nutrition for my infants.  One of the many things that I decided to do and still do for our whole family is make applesauce.  Apples seem to be in abundance where I live and there are so many things you can do with them.
The first few times I made applesauce I peeled and cored every apple and then put them in a pot on the stove to cook down.  The applesauce was good but there was too much work involved for me to continue this process so I started looking around for something to help make this process easier. Two products that I found on the market were a steam juicer and food strainer/sauce makerThe steam juicer is an appliance that can be used for many things.  Besides being a steam juicer, it is a colander, steam cooker, soup pot and roaster so if you want to get your money’s worth out of it don’t store it too far away because you can use it all year long.
When preparing my applesauce I use the steam juicer first.  I wash my apples, stem, and quarter them (which allows the apples to cook faster).  I do not take the time to core them because the food strainer/sauce maker will take care of the cores.  I fill up the colander in the steamer with the prepared apples.   The bottom pan or sauce pot in the juicer must be filled with water.  Place the sauce pot on the stove filled with water, the juice kettle on top and then the colander on top of that with the lid in place.  Bring that to a boil. You should allow your apples to steam for about 60 minutes or until they are nice and mushy.
While the apples have been steaming, concentrated juice has been collecting in the juice kettle.  I drain that juice off, bottle it while it is hot and process it in a boiling water bath for 20 minutes (3,000 to 6,000 ft).  Later I use the juice for fruit drinks or boil it with sugar for syrup (great on pancakes or waffles). 
After the apples have steamed for 60 minutes and I have bottled all of the juice.  I run the apples through a food strainer/sauce maker.  This machine is great because it separates the peel, core and seeds from the pulp.  The food strainer/sauce maker is nice but not absolutely necessary either.  I have in the past just mashed my apples through a sieve.  Once the pulp has been extracted though, you need to add some kind of anti-darkening agent.  I use Fruit Fresh.   I just add the powder right to the applesauce.  The next step is to return the applesauce to the sauce pot (the bottom pot of the steamer) and add sugar.   I taste my sauce and sweeten it accordingly.  You can follow this tip. Add ¼ cup sugar per pound of apples.  I have also added red cinnamon candy to my sauce.  It gives it a nice pink color, adds some sweetness, and a cinnamon taste.  My kids think this applesauce is great.
  After you add your sugar heat the sauce to boiling.  Stir the sauce to prevent sticking.  Maintain temperature at a boil (212°F) while filling jars.  Ladle hot sauce into hot jars, leaving ½ inch headspace.  Remove air bubbles by crisscrossing a flat plastic utensil through the sauce.  Wipe around the top of the bottle. Place hot lid on the bottle and finger tighten the ring.    Process your pints or quarts of applesauce for 30 minutes (3,000 to 6,000 ft) in a boiling water bath.  After processing time is over remove carefully.  Let the jars sit on a towel covered counter for 12 to 24 hours.  Then check the seal by pressing the lid in the center.  If it gives at all it is not sealed and must be refrigerated.  Use your unsealed applesauce within 24 hours.
I know it seems like a lot of work but it is well worth the effort.  Homemade applesauce just doesn’t compare to store bought sauce.  When you do your own you have a piece of mind that you know what is going into the sauce.  It also gives you a sense of pride and satisfaction. I think your kids will love the fact that it is homemade too. So start making sauce and enjoy. 

Enhanced by Zemanta

Saturday, July 17, 2010

Victorio Stainless Steel Steam Juicer

Pin It
Extract the natural juice of grapes, berries, and other high-liquid fruits with the power of steam. Just boil water in the bottom container and place fruit in the top container. Natural concentrated fruit juice drips in the center pan where it can be extracted through a surgical-quality, heat-resistant tube. Use it for making jellies or store as concentrate for healthy natural fruit juice. The Steam Juicer is also perfect for cooking soups and stews or steaming vegetables.
Steam Juicer Capacities:
  • Over all height is 16"
  • Diameter is 10.5"
  • Colander - The part the fruit or vegetables go in - 9.5 QT
  • Juice Kettle - The part that catches the juice during the steam juicing process - 2.5 qt
  • Water pan - bottom pan of water that boils to create steam - 4.5 QT
Available at Basic Living
    Enhanced by Zemanta

    Rice Recipes

    Pin It
         Regular white rice has been milled to remove the hull, germ and most of the bran. It is available both long and short grain, the long grain being a better all-purpose rice. One cup uncooked= 3 cups cooked.

         Parboiled (converted) rice contains the vitamins found in brown rice but is polished like white rice. One cup uncooked=3 1/2 cups cooked. Precooked (instant) rice is commercially cooked, rinsed and dried before packaging. It is therefore quick and very easy to prepare. One cup uncooked=2 cups cooked.

         Brown rice is unpolished with only the outer hull removed. It has a slightly firm texture and a nutlike flavor. One cup uncooked=4 cups cooked.

         Wild rice is the seed of grass that grows in marshes. It is dark greenish-brown in color and has a distinctive, nutlike flavor. Expensive, it is sometimes combined with white or brown rice. One cup uncooked=3 cups cooked.

    RICE RECIPES

    Plain Rice
    2 C. rice
    4 C. water
    1/2 tsp. salt (optional)
         Put rice in saucepan large enough to allow for two times expansion. Cover with water to about 2 inches above rice, add salt if desired. Bring to a boil and boil uncovered until most of the water is gone. Turn down heat as low as possible; cover and steam about 20 mins or until water has been absorbed.

    Ordinary Brown Rice
    1 C. brown rice
    2 3/4 C. water
    1 tsp. salt, if desired
         Heat until boiling stirring once; reduce heat.  Cover and simmer until tender, 45-50 minutes; remove
    from heat.

    Lemon Rice
         Stir in 2 TBSP margarine, melted, and 2 TBSP lemon juice into cooked rice.

    Mushroom Rice
         Heat 1 can mushrooms, drained in 2 TBS margarine until tender; stir into cooked rice.

    Onion Rice
         Cook 2 TBSP finely chopped onion in 2 TBSP margarine until tender; stir into cooked rice.

    Parsley Rice
         Stir 2 TBSP fresh parsley into cooked rice.

    Deluxe Brown Rice
    1 C. sliced carrots
    3 TBSP oil
    1/2 C. onions
    3 C. cooked brown rice
    1 tsp. salt, or to taste
    1 TBSP sesame seeds
         Saute’ carrots in oil about 10 minutes.  Add onions. Cook 10 minutes longer. Stir in rice and salt. Cook, stirring gently until rice is heated through. Add sesame seeds; toss lightly.

    Risotto
    4 TBSP butter
    1 C. rice
    2 C. basic beef or chicken stock
         Melt butter in heavy skillet. Add rice; cook over medium heat, stirring constantly, until butter is absorbed. Pour in 1 cup stock; cook, stirring frequently, until stock has been absorbed. Add 1/2 cup stock; cook until absorbed. Add remaining stock; stir well. Cover; simmer until stock has been absorbed, stirring occasionally. Cooking time will be about 25 minutes after first addition of stock. (From the book The Encyclopedia of Creative Cooking).

    Basic Fried Oven-Cooked Rice
    4 TBSP butter
    1 C. rice
    1 small onion, chopped
    2 C. basic Chicken Stock
         Melt butter in frying pan. Add rice and onion; cook over medium heat about 5 minutes or until golden, stirring frequently. Turn rice mixture into casserole dish. Stir in stock; cover. Bake in preheated 425 degree oven for 25 minutes, or until rice is tender and stock is absorbed. (From The Encyclopedia of Creative Cooking).

    Curried Rice
    1/2 C. rice
    2 C. hot water
    1/2 C. canned tomatoes
    1/4 C. finely sliced onion
    1/4 C. thinly sliced green pepper
    2 TBSP melted butter
    3/4 tsp. curry powder
         Put rice into casserole dish; add water. Let stand about 3/4 hour. Add all other ingredients; mix well. Cover; cook in preheated 350 degrees oven about 1 1/2 hours, stirring occasionally. Most of liquid should be absorbed, but serve rice while still moist. Yield 4 servings. (From The Encyclopedia of Creative Cooking).

    Sugar-and-Spice Rice
    1 C. cold water
    1 C. whole milk
    1 tsp. salt
    1 C. uncooked rice
    1/2 C. Butter
    1/2 C. granulated sugar
    2 tsp. cinnamon
         Combine water, milk, salt, and uncooked rice in 3-quart saucepan; bring to boil. Stir once; cover.  Turn heat very low; cook 20 minutes or until water and milk are absorbed. Do not uncover while cooking.  Spoon rice into serving dishes; top each serving with 2 TBSP butter, 2 TBSP sugar, and 1/2 tsp cinnamon.  Serve immediately. Yield 4 servings.

         Unless otherwise noted the information and recipes on rice were taken from the Betty Crocker’s Cookbook.
    Enhanced by Zemanta

    Thursday, July 15, 2010

    Presto 23 Qt Pressure Cooker/Canner

    Pin It Let the canning begin!!!

    Pressure canning, the only method recommended safe by the U.S.D.A. for canning low-acid foods, allows you to preserve meats, vegetables, and fruits. Presto pressure canners feature an easy-to-read dial gauge for accurate pressure control and extra strong, warp-resistant aluminum construction. The air vent/cover lock allows pressure to build only when the cover is closed properly and prevents the cover from opening until pressure is safely reduced. Includes cooking/canning rack and complete instruction/recipe book. 22-Quart Liquid Capacity (20.9 Liters).

    Find your steam pressure canner at Basic Living!

    Also, check out our article on Steam Pressure Canning!

    Enhanced by Zemanta

    Wednesday, July 14, 2010

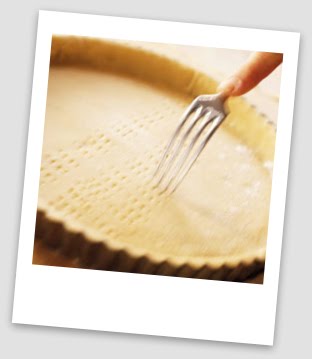
    Making Pie Crust Using a Bosch Universal Plus Kitchen Machine

    Pin It I found a demonstration on youtube.com which talked about how to make pie crusts using a Bosch Universal Plus Kitchen Machine.  She did a great job explaining the features and what items to use while making the pie crust.  I tried her method using my recipe and it worked out great!  Using the Bosch makes it easy as there is no hand work required in cutting up the fat. 

    Here is the recipe I used:

    3 cups of flour
    1 tsp. salt
    1/2 cup of lard
    1/2 cup of butter
    1/3 cup of water
    1 egg
    2 Tbsp. vinegar

    by Mechele Eckman

    www.basicliving.com
    www.survivalsuperstore.com


    Enhanced by Zemanta

    Tuesday, July 6, 2010

    Planting a Garden

    Pin It
    As I have watched the news lately, I have become even more alarmed at the cost of food. Prices have risen astronomically, and it is scary to think about.  It’s not really an optional item in anyone’s budget.  We all need to eat. So what are we to do? I, for one, can think of a lot of options, and none of them include not eating at all. Most of us have within us an ability to work. Quite a few of us have a little space, or a lot of space, that we could use for a garden. I have heard a lot of people complain that it’s not worth it to grow a garden, and that they can get the food cheaper at the grocery store when they consider their time and all. Perhaps to them it’s the better option, but I, for one, could not afford to purchase all that my family can eat. And besides, we have an affinity for fresh berries, and we would have to take out a loan to buy what we eat every year just in that category.

    It is true that many foods are readily available at a reasonable cost during the case lot sales. But that may not always be true, and prices will continue to rise. Certainly, there are some things that we need to purchase, but there are a lot of items that we can grow ourselves. The idea is to make the funds available to us go as far as possible. And a little hard work really doesn’t hurt anyone, even children, although they may sometimes have a different opinion.

    In order to maximize the usable yield from our gardens, it is important to start with a plan. What does your family really like? What won’t they touch?  How much of something will they eat before they get tired of it or it goes bad? There isn’t much sense in planting a whole row of radishes if your children would rather play kick ball with them. Perhaps a few would be fun because they come up fast and grow fast, but mix them in with the carrots, and they don’t take any more space because they are ready to pull before the carrots get big.

    Are carrots a big thing in your family?  Can they eat a five-pound bag in a week if there is veggie dip? Then maybe one row wouldn’t be enough. My sister- in-law pulls carrots, leaving the fluffy green top on, and tells her children they are “What’s up, Doc?” carrots, and the kids think they are so cool. We plant lots of carrots so we can eat all we want during the summer. Then we are sure to have enough left over for drying and cold storage through the winter.

    Corn is very popular at our house. We can eat it at dinner for several weeks and not get tired of it too fast. We also freeze a lot of it. We don’t like the taste of home canned corn, though. So when we plan how much corn to plant, we think of three things. First, how much do we want to freeze?  Then how much do we want to eat? Third is how to stagger the ripening of the ears. Either we plant it in two or three plantings about two weeks apart, or we use three different varieties that take a differing numbers of days to mature.  For fresh eating we want it to ripen gradually, but when I freeze it, I would rather it all ripen at once so I can get the job over with. We are also very careful to plant corn in blocks instead of single rows so that they are pollinated more thoroughly.

    We like to grow enough pumpkins to let each person in the family either carve one or draw on one for Halloween, according to age. We also want a few more for pies and breads. However, I don’t really think we need five dozen of them, although I am sure the neighbors would be happy to help us dispose of them if we did end up with that many.

    That brings up another point. Gardeners are fond of sharing. I think it’s partly because they like to be good neighbors, but I also think that there may be some bragging rights involved. We had a neighbor who grew onions the size of basketballs, and I am not exaggerating. They were huge! He loved sharing them with friends and neighbors. My bragging rights come from handing our tomatoes to neighbors in June from the plants in our greenhouse, while their plants are still only ankle-high. I love to share what I have grown, and I love to be the recipient of someone else’s bounty. I have found great new varieties this way, and have learned some new techniques.  Never be afraid to ask someone for advice.  Gardeners love sharing information too!

    Our family likes peas, fresh and frozen. We plant a lot of them too, but not as many green beans, even though we can a bunch every year, and eat some fresh. We don’t do much with kohlrabi or turnips, but we should. Broccoli is great to have, but I don’t seem to be able to grow much of it.

    Potatoes are a big crop for us. We eat a lot of them, and the children love to go out with Dad to dig them up in the fall. It’s a treasure hunt for them. But we are always careful to plant some red potatoes that will be ready to eat much earlier, when the peas are on, so we can have the old family favorite dinner of peas and potatoes. We plant several rows of potatoes.

    Consider planting cucumbers, summer squash, cabbage, tomatoes and peppers, among others. I like to plant a lot of tomatoes. We like them in tacos, BLT sandwiches, and I make lots of salsa and spaghetti sauce. I have a few children that will eat them like one would eat an apple. I certainly don’t want to run out of them! I also grow the onions and peppers for the salsa, and I need to grow lots of onions for freezing and drying. That makes it easy to throw a handful of them into a soup.

    When I set out our garden, I take the needs of our family into consideration and plot out our available space with what is most important to us. There is no reason to waste time and space on something that they won’t eat. But then, maybe a little of something new would be good for them. Just don’t turn half of your garden into a brussels sprouts patch if your family will mutiny if you serve them more than once a year.

    Think about staggered planting, or two crops in one season, such as lettuce or peas. How much does each foot of row produce? How much do you really need? Remember that the first year that you raise a garden is a learning experience. Also remember that the twentieth year that you raise a garden is a learning experience. You will always find new and better ways to do things, and you will also find out what really doesn’t work for you. You will be able to experiment with different varieties of vegetables, and perhaps some wonderful neighbor will share some heirloom seeds with you. Gardening is definitely an adventure!

    Our children, as they fill their tummies with fresh bread and fresh homemade raspberry jam and an apple or carrot on the side, or with still-warm peas from a sun-kissed pod, talk about how wonderful their life is. It really makes me smile. What they are eating is quite inexpensive, but very good for them, and they are probably also content remembering that they helped weed, water and pick the produce, and that gives us all a great deal of satisfaction.

    By Donna Howard

    56 East Main Street
    Rexburg, ID 83440

    info@basicliving.com
    888-656-0411

    www.basicliving.com
    www.survivalsuperstore.com
    Enhanced by Zemanta